Showing posts with label art. Show all posts

Tuesday, April 19, 2011

Subway Art: My Version and a Mini Buffet Makeover~

Okay, so I have to preface this post by reminding you that I have an obsessive need to constantly tweak and redecorate. So I had barely finished redoing my small buffet (as seen in this post) when I already had the desire to tweak it. Don't get me wrong. It was pretty. Just not quite "me". Know what I mean?

BEFORE (pretty, but not quite right):


The more I looked at it, the more I knew that I wanted to bring back a bit of the black. I like the sophistication that a bit of black brings.


I also have been crushing on all the subway art signs that I have seen floating around blogland. So I decided that it was high time I made some for myself.


Here is my version...filled with cities that are meaningful for our family. For example, Kennebunkport, Maine - at the very top of the sign - is where the hubby and I spent our honeymoon. Newport, RI is where we spent my 24th birthday. Just last year. (ha, just kidding!) You get the idea.


When I put it up on the wall, I knew other things were going to have to change as well. The pretty pink faux cherry blossoms looked much too sweet against the sign. So I replaced them with white blossoms in a rustic vessel. Then I brought back my pretty terrarium that had previously been on the buffet. But the two things looked a little bit lonely, so I added a stack of old books tied with twine.


Finally, I decided that the lamp needed a little bit of zing, so I added some grosgrain ribbon around the top and bottom. A little dab of hot glue holds the ribbon in place so that I can easily remove it when I'd like another change.


So here she is...the little buffet all done over (again.) I'm lovin' this version. And that cute subway art? I'll have a tutorial for you soon.


Have a great day~

Monday, December 13, 2010

Custom Art on the Cheap~

Some of you may remember that at the request of my 7-year-old Princess, I have been adding brown into the decor of her bedroom.

I began by adding brown vinyl polkadots to one wall. (Yes, I will accessorize the dresser at some point...after Christmas...I hope.)

Then I created a pretty pleated pillow for her bed.


But I was slightly stumped as to how I was going to add brown to this shelf. (A small note: the dresser has been moved to the polka-dot wall, leaving a gaping "hole" under this shelf which I hope to remedy by finding the perfect chair. ahem. Now, back to the subject at hand...) So I put on my thinking cap.


And somewhere in my musings I hit on the idea of creating art out of the fabrics in the Princess' room. But, as always, there was a catch. And the catch in this case was the fact that I (as usual) didn't have much of a budget, and I didn't have much of any of the fabrics I used in the room left over.

The solution came during a trip to the dollar store. I saw some 8x10 natural wood frames. And some 2 for $1 white mattes. So I bought a few of each. Once I got them home, I spraypainted the frames white. Then I simply cut swatches of the fabric to fit the matte openings and taped them on the back with painter's tape. Popped the mattes in the frames and VOILA! Custom art. (Okay, you caught me, the brown polka-dot fabric was not used in the Princess' room...it actually came from the little boys' room, but it was the perfect color, and the dots echo the dots on the wall...)


Now to figure out how best to finish accessorizing the shelf. But at least I have a good start...


And I had to throw in this photo of Mr. One and the Princess for no other reason than that I "heart" it entirely. I am insanely in love with my kiddos.


Have a great day~

Thursday, June 10, 2010

Frugal Friday~

Some of you may remember a few weeks back when I was discussing the fact that I wanted an overscale photo for my boys' sock monkey bedroom. Well, I did a lot of research trying to find a product that was what I wanted in a price that wouldn't break the bank.

Finally, while I was cleaning out my "favorites" file, I ran across a post that I had bookmarked a couple of years ago about creating vinyl wall clings. Turns out, it was exactly what the doctor ordered.


Wallhogs is a company that specialized in creating large art prints from your photographs or digital prints. They don't only create vinyl clings, they also use an adhesive backed fabric called PhotoTex, glossy posters, or canvas. They can make an image up to 7 feet! And the adhesive backed fabric and vinyl clings can be removed or repositioned without damaging the wall. (perfect for renters!) But, the best part? Their prices!! SUPER AFFORDABLE!!


Here's the picture of the hubby that I wanted to put on the boys' wall.


I uploaded it to Picnik.com and played with the colors until I got a sepia/brown combo that I knew would work in the boys' room (I thought the black and white wouldn't go over so well.) Then I made sure it was at a high enough resolution to enable a large print. After all that, I hopped on the Wallhogs site, followed their easy instructions and in a few days I had my 4 foot vinyl cling.


I must admit, it was a little time consuming to install...and it took 2 people...but I just love the result!! (Although I've decided it doesn't look nearly as large in the photos as it does on the wall..hmmm.)


And for those of you who are wondering...no Wallhogs didn't pay me for this post....I was just really impressed.


Now it's your turn!

You know "da rules"...

1. Link directly to your post and not just to your blog.

2. Please link back to the Shabby Nest so that others can enjoy the Frugal Goodness!

3. Comment, comment, comment. Show our participants the love!!


Wednesday, June 9, 2010

Displaying Kid Art~

I have sort of an art theme going this week...first with the great Modern Bird Studios giveaway (you still have time to enter, by the way...just click here.) And now, I have some fabulous ideas to share for displaying kids' art. And something tomorrow for Frugal Friday as well - how's that for a teaser?

On to the kids' art...

I simply loved this idea that Janell from Isabella and Max Rooms used in one of her client's homes. The picture rail on the wainscotting in this dining room provides a resting spot for a whimsical display of children's art. (And the beauty of it is, that it can change whenever a new masterpiece is created!)

I also really love this idea from designer Jan Eleni. See that great big piece of art? It's actually composed of a bunch of little square reproductions of one child's art! You could easily recreate this look with your own child's (or children's) artwork...what a great way to display them all without crowding your refrigerator door! ;-)


A perfect summer project...go round up all that art your kids dragged home with them from created in school this year and create a sentimental keepsake that looks uber-stylish!

Frugal Friday goes up tonight at 11:59 EST. Get your frugal inspiration going, and I'll see you then!

One last note: My Summer Sponsor Sale is still going on....one month for $35 or all 3 for $90. That's a lot of advertising bang for your buck! Email me if you'd like more information.

Have a great day~

Monday, June 7, 2010

Modern Bird Studios Giveaway

Art is such an important part of creating a space. And personalized art is even better because it speaks volumes about what is important to you as an individual. This is where Modern Bird Studios comes in. Modern Bird Studios takes your personal photographs, waves their magic wand, and presto! creates the most amazing pieces of art I've seen in a while! Don't believe me? Go here and see for yourself.


Okay, so maybe they don't use a magic wand, but they do combine both technology and hand painting to create these fabulous pieces of wonderfulness. Gregg and Megan Deal are the talented husband and wife team who own and operate Modern Bird Studios. Gregg is the very talented artist who creates the pieces (so talented, in fact, that he is having a solo art show in their home town of Washington DC). And Megan is the marketing/PR, office manager, super-ninja behind the business end of Modern Bird. She is amazing to work with and one of my newest BFFs.


The process of creating these masterpieces goes a little something like this...you send them some of your favorite photos...then you pick size you want and the colors using their convenient color chart. But never fear...they'll help you through the process if you get confused. In fact, I tried a few different color combinations before arriving at the final product. And don't think that you just have to use photos of people, oh no! Check out this incredible depiction of the Colosseum!


The final product you'll receive is a beautiful custom piece on oak composite wood...just begging to be displayed!!


I needed some art for one of the walls in my little boys' sock monkey bedroom. So I sent Modern Bird some photos, and this is what I received...


I can't get over how adorable they are! I emailed Megan to tell her that I find reasons to go into the boys' room now just so I can look at the wonderful Modern Bird pieces (and that says a lot, because their room was already one of my favorites in the house!)


So now comes the fun part! Modern Bird Studios is offering one lucky reader of The Shabby Nest a 12″ x 12″ personalized piece (valued at $215).


How to enter: Simply leave a comment on this post.


You can earn extra entries by following Modern Bird Studios on Twitter or becoming a fan of Modern Bird Studios on Facebook. (please make sure to leave an extra comment for each thing that you do...I use Random.org to pick the winner, and each comment will only count once.)

Open to lower 48 states only.

No previous winners are eligible to enter.

Contest open until June 14th at 11:59 EST.

Finally, those sweethearts are offering a 15% discount to Shabby Nest readers....simply use the code SHABBYNEST at checkout. Offer expires ONE week AFTER the contest ends.
Good luck~

Tuesday, May 25, 2010

linky love

It's Linky Love time!!!

Frugal Fridays are growing! And I'm loving the chance to see so many great Frugal decor ideas!!


Because I have a few spots in my home that are in sore need of some wall decor, today I wanted to link to just a few of the wall art projects that were shared at last week's Frugal Friday...


First up, Flamingo Toes shared a fabulous photo canvas wall art project. Hello? I didn't even know you could buy printable canvas...ahem...I see some serious projects in my future!


Next, Sprik Space shared a FREE printable ABC poster. This would be perfect in a nursery, child's room or playroom...and in so many colors! Darling!


Sallygoodin shared a fun "Hokey Pokey" sign...I'm all about a little whimsy in decorating (or outright humor if needs be.)


And finally, ever wondered what to do with all that kid art that accumulates? Holly's Haven shared a fun idea to create personalized art for your kids.


And that's just the tip of the iceberg folks! If you haven't had a chance to check out all the goodness that was last week's Frugal Friday, click here. You'll be glad you did!

Have a great day~

Thursday, May 20, 2010

Frugal Friday~

It's that time again!! Time for this week's edition of Frugal Friday at the Shabby Nest! Woot woot!

Today, I have another little "art on the cheap" project to share with you.

Some of you may remember the art I created for our main bathroom a couple of months ago. I just framed up some pretty fabric.

I still think the fabric is pretty, but I just wasn't feelin' it. I wanted something that was more "me".

BEFORE:


I'd been tossing around the idea of creating some canvases for a while, and had originally considered painting some with a chevron motif, but then I decided that something a little more organic would be better.

So here is what I came up with...


I started by creating a template (which I don't have a photo of). It consisted of the center shape that you see between the thick lines. Then I just traced it onto the canvas (over and over again) putting enough space between each one to create the lines that I then painted.


Here's a view of one of the paintings in-progress.


And here again, is the final project! Loving them!! And the clincher was that I just used some leftover latex paint from my rehabbed console. Perfect!

AFTER


Now it's your turn...

You know "da rules"!

1. Link directly to your post, not just to your blog.
2. Please link back to the Shabby Nest so others can enjoy the Frugal Goodness.
3. Comment, comment, comment. Show our participants "the love!"


Monday, May 10, 2010

Overscale Photos~

I've been enamoured with this room since I first spied it on Ohdeedoh a few months back. And if I had to be completely honest, the thing that makes this room for me is the uber-fabulous wallpaper. I adore overscale photographs.

Via Ohdeedoh


So when I ended up with a big empty wall in my little boys' sock monkey bedroom, I decided that I wanted to fill it with an overscale photo. I have the perfect black and white photo of the hubby as a child on horseback. (I'll share later I promise.)

via Holly Mathis Interiors

Since we live in a rental, I obviously can't choose the wallpaper option, so I'm leaning toward a large stretched canvas like the one above. But here's the thing. Stretched canvases in that size are quite pricey (even with the pro-photographer's discount we can get at our processor).

So I just wanted to throw a couple of questions out there to you all in blogland...

First, what do you all think of overscale photos in decor?

And second, does anyone know any alternatives to stretched canvas...I don't know, perhaps advertising banner type prints? Just checking out the alternatives before I make my final decision.

Happy Monday~

Wednesday, April 14, 2010

Art Prints for Kidz~

I'm a sucker for children's books. I simply adore them. We have a HUGE collection of them here at our house. And, to be honest, the thing that draws me to most of them are the illustrations. I especially love vintage children's book illustrations.

So imagine how excited I was when I was contacted by Art Prints for Kidz. They carry original water color prints and a large variety of vintage children's book illustrations as well. In their own words, "For our vintage prints, we searched for art from the late 1800's and early 1900's, cleaned the pieces and digitally restored their brilliant colors. When re-printing these vintage art pieces, high quality acid free and lignin free 32 pound archival linen paper is used."

And when they say they carry a large variety...they're not kidding!! There were so many prints to choose from, it was extremely hard to narrow it down.

I just loved this piece.


Beatrix Potter is a perennial favorite.


This little lady is sweet and whimsical.


When my prints arrived, I was amazed by the vivid colors and the detail that has been retained in each print. They are simply lovely! And the price is perfect...just $10 per print.


This beach print is my absolute favorite...I could design an entire room around this one...who knows? Maybe I will.


If you love vintage children's book illustrations...or are looking for some fun art for a nursery or playroom, Art Prints for Kidz is definitely worth checking out.


In the interest of full disclosure, I was gifted my prints in exchange for this review.

Have a great day~

Thursday, April 1, 2010

Frugal Friday~

Welcome to this week's edition of the Frugal Friday Linky Party! So glad you all could join me!

Perhaps you've seen this pretty skeleton key art that Restoration Hardware sells for $199. Love it....but definitely don't love the price.


Image from Restoration Hardware

I had similar frames that have been reincarnated a couple of times for my bedroom. If you've been reading my blog for any length of time, you may remember this version.


Pretty, but definitely doesn't fit in my newly redone master bedroom.


So I simply tore off the scrapbook paper that I used to wrap the mattes. Then I pulled out a few skeleton keys (luckily I have been saving them in my stuff-that-I-plan-on-using-to-decorate-someday collection) and hot glued them onto some scraps of linen fabric. Popped them into the frames and VOILA! My own skeleton-key art for free.


And it looks very similar to theirs, don't ya think?

Times that by 3, and I figure I saved myself about $600 AND I got the perfect art to fill up the empty wall space on the left side of the bed.


Now I'd love to see what you all have been up to this week!
You know "da rules"...
1. Link directly to your post, not just to your blog.
2. Please link back to the Shabby Nest so others can enjoy the frugal goodness that is the Frugal Friday Linky Party.
3. Comment Comment Comment!
Enjoy~


Wednesday, March 24, 2010

How To Make Your Own (Pretty) Art~

Okay peeps...today I'm going to tell you all how I created the piece of art in my master bedroom redo. (or that damask thing-y hanging above the bedside table.)
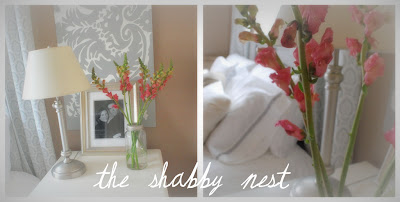


This is a great idea to keep in mind when you really want a piece of art that will complement a space, and you just can't seem to find the right one. (Although my father-in-law who is an honest to goodness real life artist and Professor of Fine Art would roll his eyes at the concept of choosing art to "go with" a room...his decorator daughter-in-law, that would be me, does it all the time.)


In the case of my room, I really wanted to incorporate gray damask. I was hoping to use it for the curtains, but with the amount of yardage I needed, my budget would have been sunk. So I decided to bring the damask into the room in a stylized piece of art.
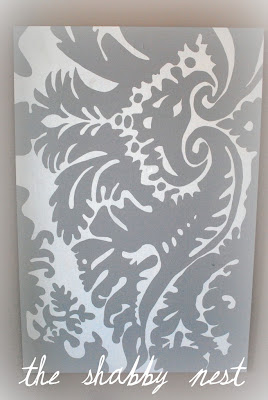
Here's what I did...


1. I found myself a piece of wood in our back room that had a smooth surface (you could also purchase a canvas, but I was aiming to use what I had)


2. I found a damask pattern I liked. In this case, it was a picture of a fabric sample, Natele from Duralee, which I printed out so that I would have a pattern to work from. As you can see, the pattern was quite intricate, so I tried to simplify it as I drew it out...but I'll get to that in a minute.
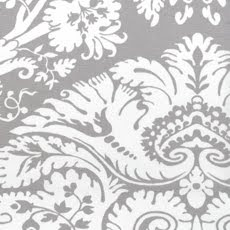

Natele from Duralee

3. I painted the piece of wood (or canvas) the background color of my pattern. In this case white. I used the same paint from my bedroom project...interior latex in white and dove gray. I would suggest using a graphic print and limiting your painting to 2 colors...unless you are a real artist. It will make the project look more professional in the end.


4. Here's where you can go a couple of different ways. In my case, I have a photo projector. I placed the print on the projector and then traced the projection onto the wood. Or if you are good at this sort of thing, you can look at your picture and freehand it in pencil onto your wood. Finally, if you don't have a projector, and aren't good at freehanding stuff, you can draw a grid on your picture and then draw each section of the grid onto your wood. (I wouldn't suggest drawing a grid on the wood - it's difficult to remove the pencil lines - but the grid on your picture will help you get the proportions correct when you draw onto the wood. )
In my case, I used the projector, and actually wish I had just freehanded it because when you compare my inspiration pattern to the actual painting you can see how the projector distorted the image. I also had a difficult time actually seeing all the lines I needed to trace. In the end I had to fix a few things, and the image is still a little off. Oh well, live and learn right?


5. Now use your other color and fill in the pattern. It's simple...just like coloring in the lines...except with a paintbrush. You'll notice that I reversed the colors in my painting using gray for the motif and white for the background. This is because I actually wanted the finished painting to be more gray than white. You can also see that I rotated the design 90 degrees...that's just because I liked the composition better that way.


6. VOILA! A custom work of art.


Don't forget tomorrow is Frugal Friday again!! MckLinky goes up at 12:00 am EST for all you night owls.

And this week's winner will be announced at So You Think You Can Decorate on Saturday...next week's challenge goes up on Sunday. You can vote until Friday at 12:00 MST.

Have a great day~