Showing posts with label pillows. Show all posts

Thursday, December 30, 2010

Favorite Projects of 2010~

Honestly, I can't believe that 2011 is just a couple of days away. The last few months of this year seemed to crawl by as the hubby recuperated from his car accident and I wondered if life would ever get back to normal. But as things started to gain some semblance of normalcy, this year sped up and now it's virtually sprinting to the finish line.

As I looked back over 2010 at The Shabby Nest, there were a few projects that really jumped out as my favorites, and I wanted to share them all with you. (Just click on the project's title if you'd like to learn more about it.)

Pillow tutorials...

The Pretty Pleated Pillow


The Snowblossom Pillow


Furniture redo's...

The Rehabbed Console


The Princess' Wrought Iron bed


Miscellaneous...

DIY Smocked Curtains


PB Knock-off Chalkboard


Room Redo's...

The Sock Monkey Bedroom


Whew! What a list! Linking up to Rhoda's Top Projects of 2010 Party!

I'm sooooo looking forward to 2011 and all the projects it has to bring! I hope you'll all join me for the ride.

xoxo
Wendy

Thursday, December 23, 2010

A Little More Christmas~

I'm ready. No really, I'm ready. Okay, except the fact that I have to run to the grocery store and pick up a few salad fixins for Christmas Eve dinner. But all the gifts are wrapped. Those that need delivering are delivered. All the preparations are made. Now I can sit back and enjoy the last couple of days before Christmas.

We've had another run in with the stomach flu in our family this week. And it took me completely out of commission for 24 hours. 24 hours of down-time right before Christmas is SCARY if you're a type-A control freak like I am. But at least I was up and running in time to get everything ready. And, at least for the moment, everyone in my house is flu-free. (Knock on wood.)

So I'm going to enjoy some of this...


...pajama-clad littles reading favorite Christmas stories. We'll play a little Wii, watch some movies, snuggle and enjoy. This is such a magical moment in time...with a house full of wiggly little bodies who can hardly contain their excitement. I just want to soak it up, because they won't be this little forever.


Okay, so I haven't mastered the art of photographing in very low light. But I loved this scene in my living room last night, so I had to snap a pic. (And it shows -sort of- my two Christmas gifts...a new rug and coffee table...I'll tell you all about them later. I'm so excited!!)


And, in case you are in need of a last minute Christmas gift...check out these sweet little pillows I whipped up last night while sitting at my kitchen table and staring at the scene above. The downloadable graphics are found on one of my newly-discovered favorite blogs, Dear Lillie, right here. Just print them out in reverse on some photo transfer paper, iron them on your choice of fabrics and stitch up some pretty pillows.


Have a great day~

Wednesday, November 17, 2010

Pretty, Pleated Pillow: A Tutorial~

A little while ago I posted about the fact that I wanted to spruce up the Princess' bedroom. I started by changing out the wall behind her dresser and adding a canvas photo and some brown vinyl polka-dots. (The Princess had asked that we include brown in her room...and since we live in a rental home, painting was out of the question, so in came the polka-dots). Please disregard the desperately-in-need-of-a-makeover dresser...it's coming.


After adding the dots, I knew that I was going to have to find other ways to bring the brown color into her room.

I love pillows. In fact, I may just have a little bit of a pillow addiction problem. So I decided that adding some brown in the form of a pillow was a good idea. But I wanted the pillow to feel feminine as well. And since the other pillows on her bed have a good deal of pattern to them, I wanted it to be a solid color. And, oh yeah, I had to use what I already have on hand. (That's a pretty tall order, huh?)

Luckily, I had some brown velvet in my fabric stash, leftover from some projects in the boys' room in our old house. I also happened to have quite a bit of the brown wired ribbon that I used to "hang" the canvas photo on her polka-dot wall. So here is what I came up with.


A pretty, pleated pillow. Now, if you are a sewing perfectionist, I implore you to stop reading at this point. But if you believe that imperfections only make things better, I have a little tutorial for you. (And if you're neutral on the whole imperfections issue, you'll probably like the tutorial as well.)


What you'll need:

  • Fabric (about 1/2 yard)

  • A pillow form or polyfil...I usually like to stuff my pillows with polyfil, but in this case, I had an existing pillow that I was recovering, and it had an insert, so that's what I used.

  • 2 1/2" wired ribbon

  • Matching thread

  • Pins
  • Measuring tape

Instructions:

1. Start by cutting two squares of fabric about 1/2" larger all the way around than your pillow form. (In this case I was using a 14" pillow form, so I cut 15" squares)


2. Cut 5 lengths of ribbon approximately twice as long as the squares you just cut. I usually add another inch or two for good measure.


3. Pick the square that you would like to be the front of the pillow and measure one side (this will be the top of your pillow) to find the center. Pin the top of one piece of the ribbon in it's center at the center point of the pillow front.

4. Working from the center, pin each additional piece at the top, so that each piece is parallel with the piece next to it. (You will notice in the photo, that there are pins running parallel to one of the edge pieces. I use these as a guide on the first piece that I sew to make sure that I keep it straight. After the first piece is sewn, I then use it as a guide for the second piece, and so on.)


5. Begin sewing one of the edge pieces. Approximately every 2" fold the piece back on itself about 1/2" to create a pleat. Then continue sewing right over the pleat you've created. Continue to do this for the entire length of the ribbon. This is where being a perfectionist is discouraged. (Well, impossible, in my case.) I simply eyeball these pleats. They are by no means perfect. But once you get the hang of it, you can eyeball it pretty easily.


6. Continue this same process with each ribbon. The pleats do not need to line up with the pleats in the previous piece. In fact, the overall piece will look better if the pleats do not line up. (Trust me on this.)


7. Once you have finished sewing all the ribbon. Pin the right sides of both fabric pieces together and sew, leaving a 1/2" seam allowance. Make sure to leave one side about half way open so that you can slip your pillow form in.


8. Trim the edges, clip the corners and then turn the pillow right side out. Put the pillow form in the pillow and close with an invisible hand stitch.

That's it!

Here's the pillow on the Princess' bed...just the right touch!


My November thankful thought for today....I am thankful for some bloggy love on Ohdeedoh. My canning jar frames were featured on their fabulous website yesterday! Eeek!!

Have a great day~

Tuesday, November 9, 2010

A Pretty Pillow Tutorial~

It's finally here! This tutorial took me (much) longer than I thought it would. But I finally finished it, and I hope you'll all love this pretty cushion as much as I do.

Here she is in all her ruffled glory.


I've wanted to make a pillow like this for a very long time, but I wasn't sure what sort of fabric I wanted to use. Then as I was looking through my latest round of PB catalogs, I noticed that felt pillows were everywhere! And that's when my inspiration hit, and I decided to create this beauty out of felt. Yep. Felt. And since we're heading into winter, I thought that snow white felt would be the best fit. I call her "The Snowblossom Pillow".

To make a Snowblossom pillow of your own, you will need...

  • 1 yard of felt
  • matching thread and needle

  • scissors

  • tape measure

  • polyfil

  • patience...lots of patience

Instructions...

1. For a 16 x 16 pillow, cut two pieces of felt to 17" x 17" (to give yourself a 1/2" seam allowance)


2. Mark a square lightly with a pencil in the center of one square. (I made mine 6"x6")


3. Cut approximately 120 2"x2" squares from the felt (no need to measure these...you can eyeball it.)


4. Cut each square into a circle. These do not need to be perfect. I've found that cutting the squares and then rounding them into circles actually produces less fabric waste, but if you have a better way of cutting the circles out, then by all means, do it.


5. Fold a circle in half. (Please disregard the remains of my Halloween black fingernail polish...)


6. Then fold it in half again, and stitch the corner a couple of times to keep it in the triangle shape. Then sew the same corner to the base piece inside the square that you drew.


7. Continue this with the other 119 pieces, sewing them on at different angles to give the piece movement and flow.


8. Once you have finished applying all the circles, use a sewing machine to sew the front and back of the pillow together with the applied circles inside. Leave one corner open and then pull the fabric through to reverse it.


9. Stuff the pillow and sew the corner shut by hand.


That's it! You have a beautiful pillow!!


This pillow is actually intended for the bed in our master bedroom. I'll have to show you a photo of how it looks later because at the moment our comforter is being laundered. You see, sometime in the middle of the night, Mr. Three made his way into my bedroom, and climbed into bed with me. Early this morning, I heard a gagging sound. In my groggy state, I wasn't sure what I was listening to until it was too late. Mr. Three had the stomach flu, and my comforter paid the price. Luckily, I realized what was going on and jumped out of bed, grabbing him on the way. We made it to the master bathroom before round two hit, but the damage to the comforter was already done. Hence, the comforter in the wash. Too much information? Sorry, just keeping it real. Thus is life with toddlers. Now, I'm just hoping that his "bug" doesn't make its way through the rest of the family.


Okay, but sick toddlers aside, hope you enjoyed the tutorial. I decided to link up to the CSI challenge this week. Good luck for me that the challenge was on pillows this week, eh?


Visit thecsiproject.com

Have a great day~

Wednesday, June 30, 2010

Linky Love~

Hello out there!! Welcome to another great edition of Linky Love! Last week's Frugal Friday was the biggest to date...and chock full of frugal inspiration.
It brought with it lots of pillow posts...so today I thought I'd share a few of them with you.


First up, Under the Table Dreaming shared a fun painted Cabana Pillow tutorial...so fresh and summer-y!


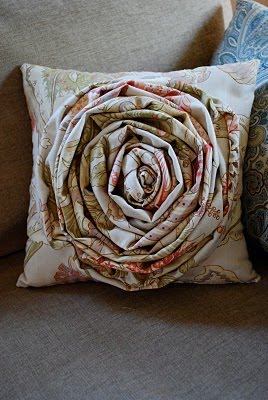
Next, Lemon Tree Creations gave a great tutorial for making oversize rosette pillows.


Decor to Adore shared a ticking pillow tutorial.


And finally, The VG Huis shared her fun burlap pillow makeover.


For more pillow posts and other fabulous Frugal Inspiration click here.

Have a great day~

Sunday, March 28, 2010

So You Think You Can Decorate: Week 5 Challenge~

Welcome to Week 5 of So You Think You Can Decorate! And this week's challenge is fabric!


I must admit that I have a bit of a fabric obsession. It's amazing what fabric can do for a room. Let's take my son's room for example. A typical basement bedroom. It has a very small window which doesn't provide much in the way of a focal point. (or much light for that matter, so please forgive the photography.)


Here's the after of that same room...with fabric added in the form of a roman shade, drapes and accent pillows. What a difference!! (Again, please forgive the low light photography....not the best to show off how cute everything actually turned out...sigh.)


First up, the roman shades and drapes. I actually made the shades using a vinyl mini-blind, Fabritac glue, and denim. A super easy and inexpensive way to create custom roman shades in whatever fabric you choose. And when I say easy, I mean this is seriously easy folks!! And since I used a tutorial to make these....I'm going to share it with you! Here's the link.

The drapes were created using blue and white ticking fabric. They were very simple to sew. I chose not to create a rod pocket, so all I did was hem the top and bottom, leaving the selvages instead of hemming the sides. Then I pinched the tops and attached curtain rings to hang them.

Here's a closeup of the back of the roman shade, so you can see the "skeleton" I created from the mini blind, and I tried to get a decent closeup of the window treatment....you can sort of see the folds of the roman shade...(drat that basement lighting.)


In this photo, you can see the way the ticking drapes frame out the bed. The addition of handmade accent pillows adds softness and personality to the bed.

I made these pillows using one of my favorite tricks...photo transfer paper. I just love my son's handsome face looking back from his bed...even when he's not sleeping in it. The firetruck pillow features a vintage firetruck photo and more blue ticking to tie in with the drapes.

A couple of tips on using photo transfer paper...first, I recommend the Avery brand. I am not being paid by them, I have just tried pretty much EVERY brand of photo transfer paper out there, and I have had better and more consistent results with Avery than with any other brand.

Second, if you are using text in your design, MAKE SURE YOU REVERSE IT. You will need a photo editing program to reverse the text...but make sure you do it. Unless you are extremely particular about an image, they can usually be printed without reversing them. I didn't reverse either of the images used in this project, and I can't see a difference.

Then all you need to do is follow the directions on the package. Photo transfer paper is very easy to use, and can create some great custom pieces for your home.

For the pillow with my son's photo on it, I simply ironed the photo transfer directly onto the fabric I was using for the pillow. For the firetruck pillow, I ironed it on a seperate piece of canvas, cut it out, and then sewed it as a patch onto the ticking fabric. (Which leads me to another tip on using transfer paper...you don't want to use the transfer paper on fabric with a print...the print will show through).


After seeing how cute the portrait pillow turned out, I think I may have to make one of each of my other three kiddos....wouldn't they make a great addition to a family room?

Like I said, it's amazing what fabric can do for a room!!

The competition is getting tough over there at So You Think You Can Decorate. If you liked this project, please hop over and give me your vote. I could really use it. ;-)


Have a great Monday~


xoxo
Wendy

Sunday, December 20, 2009

I Spy~

I hope my cute bloggy friend Lulu doesn't mind, but when I hopped over to visit her blog the other day, I noticed this very cute photo of her entry. (Which I obviously "borrowed" and posted here. ahem.)

Image by Lulu & Co.


And what do I spy on that sweet entry bench? Why, it's one of my No. 6 pillows. It looks so cute sitting there all vintage-like. It was like getting a little Christmas gift to see that pillow in a happy customer's home.


These little darlin's will be availabe in my Etsy shop when it reopens in January. But, until then, enjoy this photo...or, even better, hop on over and enjoy Lulu's fun blog.


Have a great day~

Sunday, October 25, 2009

Gift idea~

If you've read my blog for any length of time at all, you probably know by now that I am a bit infatuated with silhouettes. And of course, I have a little thing for pillows as well.


Please welcome the latest addition to the Shabby Nest line of pillows. The Silhouette Pillow - of course yours would feature a custom silhouette. I actually made this one for the Princess for Christmas. Shhhhh. (don't worry, she doesn't read my blog unless I drag her over to look at something I've posted.) I adore the tan on white and the ruffled edge.

I can make a customized pillow for you (or your little Princess...or anyone else on your Christmas list). I just need a profile photo of said individual. Offered now in my Etsy.

Edited to add: I've had some of my pet-loving readers ask if I can do pet silhouettes...Sure...if you can get a good profile pic of your pet, I can make a pillow!

Coming up this week on the Shabby Nest...

  • Ironstone
  • Window Shopping
  • Repurposing Dresser Drawers

Have a great Monday~

Wednesday, October 14, 2009

Dressing my nest~

There is a lot of truth to the assumption that we dress our homes in much the same way as we dress ourselves. I have always loved neutrals. I graduated with a degree in Fashion Merchandising. I remember one specific class in college where we were discussing colors, and focusing, in particular on "neutral" colors. One of the girls in my class made a comment about how she loved all of the neutral colors in my wardrobe. I had never really noticed until that moment just how drawn to neutrals I am. Whites, beiges, tans, grays, blacks.

And now, a couple of years later (that's my story, and I'm sticking to it), my house is dressed in neutrals as well.

Of course, I do like to throw in a pop of color here and there. Take these fun shoes, for example. A girl's gotta love a red pair of shoes. And these sweet little things were made extra special by the fact that they were on extreme clearance at one of my favorite stores. (Tar-jay to be exact). So home they came.


And that brings me to the remainder of my story. I just love the ruffle and button detail on these shoes. I mean really love it. And I began to wonder how it might translate into a pillow. (Because no matter how I try to focus on other things...my mind always comes back eventually to home decor.) So this is what I came up with.


How I love this pillow. A little less feminine than the shoes, but still with a ruffle and a button. AND made from men's suiting fabric - that's my favorite part - so that it's a little bit masculine as well. Ah, sweet success. Can a person love a pillow? Well, I think I'm in love with this one. If you like it as well, it's listed now in my Etsy.


And to think, it's all because I decided that I had to add a little pop of color to my neutral wardrobe. Do you decorate like you dress?


Don't forget tomorrow is the Frugal Friday Linky Party. For you night owls, MckLinky will go up tonight at midnight EST. Can't wait to see what you all have up your sleeve this time!!!

Have a great Thursday~

Monday, September 28, 2009

Posting about Pillows~

Another crop of pretty pillows...

Look at this lovely special order Rosette Pillow done in white. I *heart* it completely! In fact, I love it so much I'm going to list another one in the shop...


Look at those lovely little posies...


I am a romantic at heart...and I just love the fact that flowers and ruffles are so stylish right now. What's a romantic girl to do? Add them to...just about...everything.
This pillow is made from a painter's drop cloth. (There's always another project to do with those...check out my drapes...and my tablecloth...) I got this idea from all of the "corsage" shirts we've been seeing this season. And a little tutorial I saw here. I just love the scruffy, puffy flower on this pillow...

Here's a closeup in all of its frayed loveliness...


And finally, this fun Halloween pillow using a great vintage graphic from The Graphics Fairy (one of my favorite blogs...OH the inspiration.) I'm loving this.


All of these are now listed in my shop...just waiting for someone to love them and give them a good home.
Coming soon on the Shabby Nest...
  • "Green" totes - repurposing sweaters
  • How to turn a Christmas Wreath into an Autumn Beauty
  • Make your own party platter

Have a great Tuesday~