Saturday, October 30, 2010

Happy Halloween: This Week's Ideabook on Houzz~

Happy Halloween!

This week I'm talking about Halloween decor over at Houzz.com.
So I thought I'd share my ideabook with you.

Restyled Home eclectic living room

To see the entire ideabook click below.


Thursday, October 28, 2010

Frugal Friday~

Welcome to another edition of Frugal Friday!

For the Frugal Roundup this week here are some of my favorites from last week...

First up...The Starr Family shared a fabulous tutorial on making your own Cherry Blossom Chandelier. This is definitely one for the files!


The lovely and talented Megan at Brassy Apple shared a "too cute for words" Road Trip Craft. You betcha I'll be making some of these for the next time we make the cross-country trip with the kiddos.


Cant Stop Making Things shared a fabulous twisted bat art piece. I can see many incarnations of this great idea!


And finally, Full of Great Ideas share a DIY wire photo holder that I love!!


Now it's your turn...

You know "da rules"!

1. Please link directly to your post and not just to your blog.
2. Please link back to The Shabby Nest so that others can enjoy the Frugal Goodness.
3. Please leave comments when you visit a post! Help our participants feel the love!

I reserve the right to remove posts that are not in keeping with the Frugal Friday theme. For example, posts about your business, your giveaway, or other posts unrelated to frugal projects and frugal finds.


Why I Let My Kids Spill on Martha Stewart's Carpet~

A few weeks back I was contacted by the good people at Home Depot to see if I would like to review some samples of Martha Stewart's new carpet line. Their timing was impeccable because the Hubby and I have recently been having a debate over carpet. Our entire main floor is hardwood. And don't get me wrong, I LOVE hardwood. And I wouldn't trade it in our living room. But, I really like carpeting in bedrooms. Area rugs just don't do it for me in a bedroom. And although we rent this house, and I can't install wall-to-wall in the bedrooms, I told him in my sweetest wifey way that I WILL have carpet in the bedrooms of the next home we purchase.


So what is his hang-up? He's got nothing against wall-to-wall except that it stains. Okay, I'll give him that. Stained carpet is one of my pet peeves too. But these samples I received of the Martha Stewart Living carpet, and of her Platinum Plus collection are supposed to be stain resistant. According to them, The Platinum Plus carpets are "steambonded with Scotchguard to create an invisible shield against liquid and dirt." It's supposed to bead up and wipe off easily. And The Martha Stewart Living carpet is supposed to have R2X stain resistance technology.
Well, thought I, they sent these carpets to the right place if they want their stain resistance to be put to the test. I have 4 kids. They are stain creating champions. If we can't stain these samples, it can't be done. Plus, I really wanted to show the Hubby that carpet wouldn't be such a bad idea.


So I gathered up my helpers. Don't they look excited?


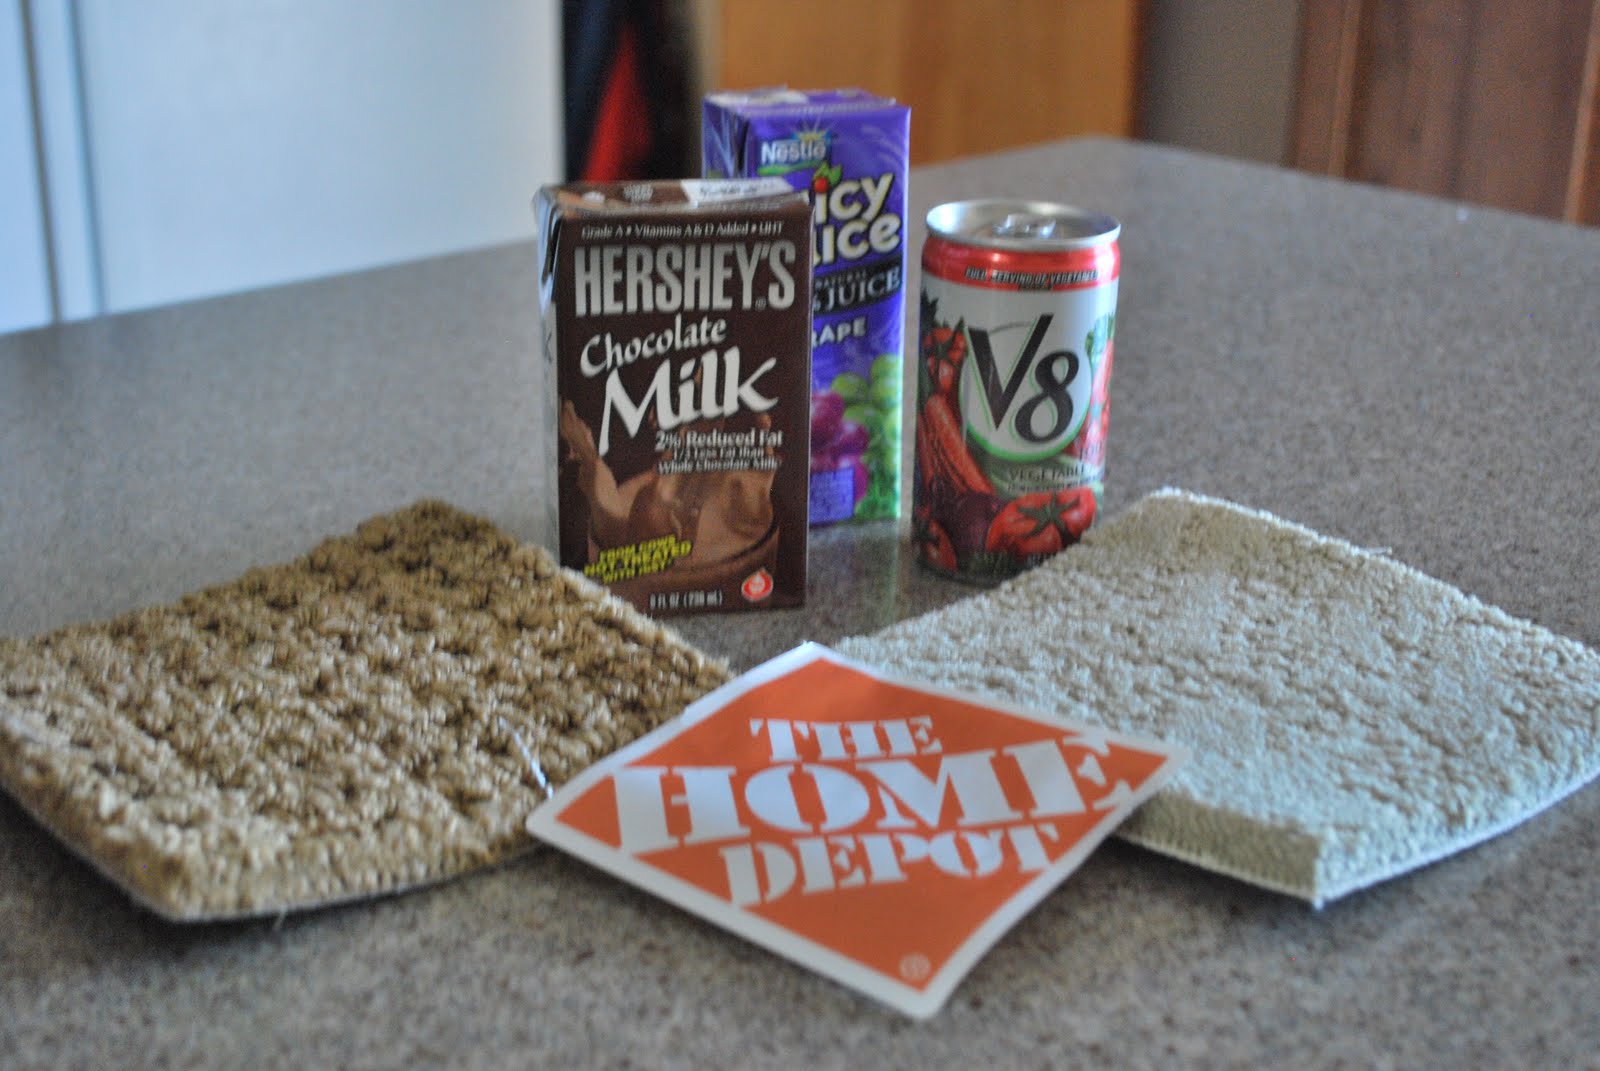
And I pulled out the "test kit" that I received from Home Depot. I must admit that the kids were most excited about the "staining agents"...the juice box, and the chocolate milk.


Then we got to work.
I must say my kids are expert stain testers. They knew just how to spill those drinks on the carpets. Although Mr. Two certainly didn't like wiping up the spills as much as he liked making them. (Doesn't he look happy in this photo?)


Oh, and never fear...we spilled a lot more on the carpets than I have pictured here...these tiny spills are for amateurs...not my kids.


And just as it said in the information they sent along with the carpets, all we had to do was wipe with a paper towel. That got most of it up. But I must admit, when it came to the tomato juice, we had to put a little elbow grease into it (well, I did anyway) and use a bit of water. But it did come up.


Here's a picture of both carpet samples after our testing was complete. You can see that they do seem to show a bit of staining. This was confusing to me. Because when I look at the samples in reality...and indeed when I showed them to the Hubby he agreed...they don't look stained. But the camera seems to pick up a bit of color. Now as I mentioned, all we did was wipe with cloths (and a bit of water for the v8 juice) we didn't use any cleaning agents. So considering all of that, I think that they came clean quite easily. This momma has a lot of experience with staining, I also know that Scotchguard doesn't work miracles, and these carpets are stain-resistant, not stain-proof, so that said, they performed quite well in my opinion.


All in all, I liked these carpets....especially the sample of the Living line that they sent (It's the darker, textured piece). The texture was pretty, and the color was great. Which reminds me. The good people of Home Depot also sent me a paint sample from Martha's new line of paint. I wrote about using it here. The reason they chose to send me the paint was because the carpet lines and Martha's paint actually color coordinate. And for those who are a little hesitant abou their ability to match carpet to paint, both the carpet and the paint have codes that help make matching easy. They're always thinking!


So, if you are having the carpet debate at your house, or if it's just time to replace the wall-to-wall where you live, you might want to check out Martha's carpet lines at Home Depot...you can put them to the test in your home!

Legal Stuff: I received the carpet and paint samples in exchange for my review, but the opinions expressed are my own.

Tuesday, October 26, 2010

Pretty, Frugal Autumn Decor~

With Halloween looming just around the corner, you may think that it is too late to decorate for Autumn. Not so, says I! Here are a few ideas that take just minutes and will make your house look Autumn-y festive! Oh yeah, and they're very easy on the pocket book.

One of my favorite Autumn planter box ideas....sugar pumpkins nestled into mounds of dried hydrangea. The color and texture are simply gorgeous.


Another idea is to fill planter boxes with small gourds and jack-be-littles surrounded by fall foliage. (Just a hint: fake leaves purchased from the dollar store look realistic from a distance and maintain their color regardless of the weather.)


For a simple centerpiece, try using a few a branches of bittersweet in a clear pitcher. Beautiful.


And finally, one of my favorite Halloween projects...folded book pumpkins. They're so easy to make and are a real conversation piece.


1. Simply take an old paperback novel and remove the cover. Be careful when you pull the cover off of the spine that you don't pull the binding away with it...otherwise the book will fall apart.

2. Fold each page in half tucking the end into the center of the book. As you fold the pages the book will begin to fan out on its own.

3. Once you have created a cylinder, you can either tape the last couple of pages together or glue them to maintain the shape.

4. These look fabulous all by themselves as sculptural pieces in a bookshelf, but if you'd like to turn them into jack-o-lanterns, simply cut face shapes from black construction paper and use stick glue to adhere them to the book.


Hope these little ideas have inspired you with easy ways to fall-ify your house!
Have a great day!

Monday, October 25, 2010

A Little Bit about the Home Office/Mom Cave~

Okay, so at the risk of beating a dead horse, I thought I'd post a little by way of explanation about my home office/mom cave because the post I did for the contest yesterday was only supposed to be 200 words. And let's just say that I'm a bit more verbose than that. In other words, I can talk (or type in this case) a blue streak. So here's all the stuff I wanted to tell you about the room, but couldn't due to word number constraints.


First up. The photos. My home office is in the basement. It has no windows. And the lighting isn't very good either. So, try as I might, I just can't get a good photo in that room. You may have noticed that in some of the photos the walls look very yellow/gold, and in some they look more tan. That's because I used the flash in some of the photos, and didn't use it in the others. The flash really washes the color out, but not using it really "yellowed" up the photos due to the indoor lighting. And even though I tried to use color correction, the photos I took without the flash are still very yellow. I guess what I'm trying to say (in my oh-so-concise way) is that the wall color is really somewhere in between the two. It is definitely closer to the color in the flash photos than the other. Mkay. Now that that's off my chest, let's move along shall we.


Indoor lighting= yellow looking walls


flash photo = washed out looking tan walls

Next up. The vinyl decals. My original intention was to put some storage shelves above the bookcase (a la my inspiration photo...you'll note, however, that I deviated to a great degree from that photo after my budget ran out.) But I found that the panelling is pretty difficult to work with, and since the hubby - aka my carpenter - is out of commission for a while, I had to come up with a different plan. So I decided to make the wall a decorative focal wall. I thought vinyl decals would be my best bet since they wouldn't permanently alter the wall. I decided on the chairs because they are whimsical....and....well....I am a designer after all. And this is MY SPACE, so I'll put cute little chairs on the wall if I want to, thank you very much. I simply used my Silhouette Craft Cutter to cut them out, and then adhered them to the wall in a sort of random pattern leaving a space in the middle for my cute quatrefoil mirror.


Here is the wall mid-process. I taped the decals where I wanted them and played around with it until it looked right to me. Not sure what the squiggle in the top center is...something to do with the flash, I think.


Which brings me to the mirror. It was a purchase at my local Target store. It was originally a dark espresso brown with a bit of distressing. When I decided to use it in the office, however, I felt like the dark finish just wouldn't work. So I decided to paint it. As luck would have it, the good people of Home Depot just happened to send me a sample of Martha Stewart's new paint line in Milk Pail. (More on that later). The color was perfect. A pale blue with a bit of a green undertone. So I used it to paint the mirror and VOILA! Perfect.

The mirror before...please ignore how dirty the glass is.


The paint sample.


Cute, painted mirror over the bookcase.


Now for what's coming...As you may note in the photos...the walls above both the desks are empty. They are awaiting special treatment. Over the smaller desk I plan on putting an inspiration board. And behind the larger desk, I want to create a chalkboard "wall" ala Emily at Jones Design Co. Since I can't paint the wall, I've had to come up with a creative idea for how to do it...you'll all have to wait and see...


Finally, since the room really lacks lighting, I want to add some additional light, and I thought that a pretty chandelier or some blingy sconces would be the best way to do that. They'll have to wait, however, until I get a little extra $$$.


Whew! Are you all still with me? I warned you that I can get a bit verbose, didn't I?
I look forward to sharing with you the rest of my little home office/ mom cave's progress as it comes. (And maybe I'll be lucky enough to win that contest so I can bling her up just a bit!)


Have a great day~


PINK October

Sunday, October 24, 2010

My Mom Cave: The (in progress) Home Office~

Welcome! Today I'm participating in the "Mom Cave" contest over at Centsational Girl!


Mr. One and his mad photography skills caught me hanging out
in my favorite reading chair in the office


I have been wanting a space in my home that's just mine. So I've adopted the home office as my "Mom Cave".

Here is the way the office looked when I decided to claim it. Let's just say that it left me feeling a bit "uninspired."


So I came up with a plan. But everything changed when my husband John was in a serious car accident just a few days after I started the redo. And the day after John's accident was my last day at work because my contract came to an end. I was unemployed, and John wasn't able to work. So my redo plans came to a screeching halt.

I'm nothing if not FRUGAL, however, so I set about doing the best I could with what I already had.


Here is what I've been able to accomplish to date. (We are renting this house, so the wall color had to stay.)


As you can see, my "Mom Cave" is still in need of accessorizing. A $250 gift certificate from HomeGoods would go a long way toward prettifying the space. And with all the stress of taking care of a recuperating husband as well as trying to find a way to make a living myself, I sure could use a pretty place to escape...don't you think?


You can check out the other entrants to the "Mom Cave" contest over at Centsational Girl.
I'll be back with more details on what I've done so far tomorrow.
Have a great day.

Saturday, October 23, 2010

This Week's Ideabook on Houzz: Built-in Bookshelves~

Do you love to read? If you have a collection of books like I do, storage becomes an issue. Sure, you can go buy bookshelves. And that works just fine. But dedicating a space to your books with built-in bookshelves is a lot more fun, and definitely more stylish.

Feeling inspired to make a commitment to your tomes? Here's a collection of built-in ideas that will have you ready to read. Not much of a reader? Built-ins are great for tchotchkes too!

loft contemporary family room

An entire wall dedicated to bookshelves can be overwhelming. Make it work by varying the size of shelves and perhaps adding space for a TV. Make top shelves easy to reach by adding a library ladder.

Guest bedroom built in eclectic bedroom

A clever way to fit a built-in into a tight space is to frame out a doorway.

1998 Showcase traditional living room

Adding larger doors to built-ins while still leaving the top shelves exposed creates a more streamlined look without eliminating display space.

For other built-in inspiration, you can read the entire article here.

Thursday, October 21, 2010

Frugal Friday~

Welcome to this week's edition of Frugal Friday and the Frugal Roundup! I really enjoyed going through everyone's posts from last week's Frugal Friday...I got so much inspiration, I'm afraid my to-do list grew by pages!

Here are a few of my favorites...


Bles-id shared a quick coffee table fix that was so creative, I just had to share!


Craftily Ever After offers up some Free Halloween Subway Art printables that I love!


Tea Party shared one of the most sophisticated "Big Girl" rooms I've seen in a long time!

And last, but not least, C.R.A.F.T. shared her very creative business cards. I. loved. these.

Show me what you've all got in store for this week...

You know "da rules"!

1. Please link directly to your post and not just to your blog.
2. Please link back to the Shabby Nest so that others can enjoy the frugal goodness.
3. Please comment on the posts of those you visit. Help our participants feel the love.

I reserve the right to remove links that are not in keeping with the spirit of Frugal Friday i.e. links to your business, your giveaway or other posts unrelated to frugal projects or frugal finds.


Wednesday, October 20, 2010

An Eye for Pretty~

One of my readers once told me that I have an eye for pretty. Because I'm in the middle of a few projects with none of them blog-worthy at the moment, today I'm sharing some of the inspiration images I've saved in my files. I hope you think they're as pretty as I do.

Tweeted by Layla of The Lettered Cottage

Via Houzz.com

Decorating for Small Spaces


Decorating for Small Spaces


Simply Seleta

Lonny Magazine


Decorating for Small Spaces


Sixty-Fifth Avenue

Just a reminder that the Frugal Round-up is now part of Frugal Fridays...And speaking of Frugal Friday...it goes live tonight at 8:00 pm Mountain Time.

Have a great day~