Wednesday, March 31, 2010

A Busy Month~

April is shaping up to be a crazy busy month for me. But crazy busy in a good way...


Tonight I am giving a presentation on Interior Design and Making Our Homes Inspiring Places to Be for the women in my church. I'm really excited...and a bit nervous as well.


Next week is Spring Break for my kiddos. Actually looking forward to a little down time with no chauffering to and from school...no homework...no alarm clocks...oh! it's sounding better all the time.

Then for some really fun news...the Princess and I were selected to take part in Justin Hackworth's 30 Strangers photography project! I've wanted to do this since he started the project a couple of years ago, and was lucky enough to be chosen for this year. Can't wait to see the fabulous images he comes up with...


Also on this month's calendar...a blog radio interview with FaveCraftsRadio. My tummy does little flips every time I think about this, but I'm really excited! I hope you'll all tune in and hear what I really sound like. I'll be talking about this here l'il old blog as well as some of my plans for the future...should be a lot of fun!


Oh, and next week...I'll be announcing an exciting venture and having a great giveaway...gotta love a giveaway!
Whew! Told ya it was going to be a busy month!

MckLinky goes up tonight at 12:00 EST...can't wait to see what you all have up your sleeve for this week's Frugal Friday.

Have a great day~

Tuesday, March 30, 2010

Three~


My baby turned 3 on Friday. Three. And it was a little melancholy for me. I have four kiddos. And although I have loved it, I am actually glad to be done with the "baby phase" of my child raising, but it was still sort of sad to see my littlest one turn 3. He's not a baby any more. He's a big kid.


A couple of years ago, I started the tradition of making each of the kiddos a birthday shirt with their age on it. They all look forward to it very much. For Mr. Three's shirt, I found a cute clipart number and used photo transfer paper. Gotta love that stuff!


We just had a small family celebration...but that was enough for him.


We had cupcakes (of course!) and he really enjoyed them - and the plate I frosted them on apparently.


With the money he received from his grandparents, he decided to buy this stuffed dragon. (Actually, what really happened is that I took him into the grocery store while the other kids were in school, and he saw the dragon, and wouldn't let go of it. So I decided that it was what he wanted with his birthday money. ) He hasn't let go of it since. And he even "helped" me to take a portrait of it for posterity. Not a bad picture for a three-year-old, huh?


Happy 3rd Birthday to my baby bear!
I still have a couple of openings for April sponsors...if you want to advertise on the Shabby Nest, you can find the info here.
Have a great day~

Monday, March 29, 2010

Linky Love~

Frugal Friday is getting to be more fun every week!! I am simply in awe of all the fabulous decorating frugality out there...

Here are a few of my favorites from this week.

I absolutely love decorating children's rooms. And I adore a good theme room...they can be so hard to pull off. I am Momma Hear Me Roar shared one of the cutest cowboy rooms I've ever seen! Check out the bed...made from MDF and painted....oh. my. goodness.


And speaking of decor the kiddos, this adorable child size chair makeover from Rambling Renovators took my breath away! (love me some turquoise furniture!)


I'm always on the lookout for a great message board. I just love this one by Nice & Easy Antiques. Burlap and chicken wire! Be still my heart!


All Thingz Related shared how she made this lovely spring bird's nest shadowbox. So pretty!!


Spring is a perfect time to lighten up your decor. Holly's Haven shared her restful powder room redo. I especially love the textured wall treatment...wait til you see it!


And last but not least...Stephanie Lynn shared a very clever vase made from a recycled sweater. This is definitely one for my files!!


Thank you to all who participated in last week's Frugal Friday! Can't wait to see what you all come up with next time!


I have a few spots coming available for April sponsorships. If you are interested in advertising on the Shabby Nest, you can find information here.
Have a great day~

Sunday, March 28, 2010

So You Think You Can Decorate: Week 5 Challenge~

Welcome to Week 5 of So You Think You Can Decorate! And this week's challenge is fabric!


I must admit that I have a bit of a fabric obsession. It's amazing what fabric can do for a room. Let's take my son's room for example. A typical basement bedroom. It has a very small window which doesn't provide much in the way of a focal point. (or much light for that matter, so please forgive the photography.)


Here's the after of that same room...with fabric added in the form of a roman shade, drapes and accent pillows. What a difference!! (Again, please forgive the low light photography....not the best to show off how cute everything actually turned out...sigh.)


First up, the roman shades and drapes. I actually made the shades using a vinyl mini-blind, Fabritac glue, and denim. A super easy and inexpensive way to create custom roman shades in whatever fabric you choose. And when I say easy, I mean this is seriously easy folks!! And since I used a tutorial to make these....I'm going to share it with you! Here's the link.

The drapes were created using blue and white ticking fabric. They were very simple to sew. I chose not to create a rod pocket, so all I did was hem the top and bottom, leaving the selvages instead of hemming the sides. Then I pinched the tops and attached curtain rings to hang them.

Here's a closeup of the back of the roman shade, so you can see the "skeleton" I created from the mini blind, and I tried to get a decent closeup of the window treatment....you can sort of see the folds of the roman shade...(drat that basement lighting.)


In this photo, you can see the way the ticking drapes frame out the bed. The addition of handmade accent pillows adds softness and personality to the bed.

I made these pillows using one of my favorite tricks...photo transfer paper. I just love my son's handsome face looking back from his bed...even when he's not sleeping in it. The firetruck pillow features a vintage firetruck photo and more blue ticking to tie in with the drapes.

A couple of tips on using photo transfer paper...first, I recommend the Avery brand. I am not being paid by them, I have just tried pretty much EVERY brand of photo transfer paper out there, and I have had better and more consistent results with Avery than with any other brand.

Second, if you are using text in your design, MAKE SURE YOU REVERSE IT. You will need a photo editing program to reverse the text...but make sure you do it. Unless you are extremely particular about an image, they can usually be printed without reversing them. I didn't reverse either of the images used in this project, and I can't see a difference.

Then all you need to do is follow the directions on the package. Photo transfer paper is very easy to use, and can create some great custom pieces for your home.

For the pillow with my son's photo on it, I simply ironed the photo transfer directly onto the fabric I was using for the pillow. For the firetruck pillow, I ironed it on a seperate piece of canvas, cut it out, and then sewed it as a patch onto the ticking fabric. (Which leads me to another tip on using transfer paper...you don't want to use the transfer paper on fabric with a print...the print will show through).


After seeing how cute the portrait pillow turned out, I think I may have to make one of each of my other three kiddos....wouldn't they make a great addition to a family room?

Like I said, it's amazing what fabric can do for a room!!

The competition is getting tough over there at So You Think You Can Decorate. If you liked this project, please hop over and give me your vote. I could really use it. ;-)


Have a great Monday~


xoxo
Wendy

Thursday, March 25, 2010

Frugal Friday Linky Party (and a project)~

Welcome to this week's edition of the Frugal Friday Linky Party. Remember how I've been promising to share my own Frugal Friday post ? Well, this week I've finally done it. Today I'm talking about pretti-fying pillow cases.

When I was redo-ing our master bedroom, I couldn't find exactly what I was looking for in the pillow case department. So I decided to create my own. Well, to be honest, all I did was embellish a pair of store bought cases.

I purchased a pair of white wrinkle free pillow cases, and then all I did was sew on some ribbon. Easy peasy.

What's that you say? You don't sew? No problem. Even someone who has never sewn can do this project. All it involves is one straight line of stitching.


Pick out a ribbon of your choice, and then simply stitch it along the seam of the pillow case edge. In my case, I decided to add pleats to my ribbon. But I am not super picky when I do this kind of thing, so I didn't fold and pin...no I didn't. I just folded the ribbon as I sewed....eyeballing it for spacing. Truly, it was soooo easy, and it turned out beautifully.

So pretty, in fact, that I use the cases more like pillow shams...they add just the right touch to my bedding. (And all for pennies!!)

Now it's your turn!!

You know "da rules"

1. Link directly to your post, not just to your blog.
2. Link back to the Shabby Nest so that other's can enjoy the frugal goodness as well!
3. Comment, comment, comment...show our participants "the love"!

Enjoy!!


Wednesday, March 24, 2010

How To Make Your Own (Pretty) Art~

Okay peeps...today I'm going to tell you all how I created the piece of art in my master bedroom redo. (or that damask thing-y hanging above the bedside table.)


This is a great idea to keep in mind when you really want a piece of art that will complement a space, and you just can't seem to find the right one. (Although my father-in-law who is an honest to goodness real life artist and Professor of Fine Art would roll his eyes at the concept of choosing art to "go with" a room...his decorator daughter-in-law, that would be me, does it all the time.)


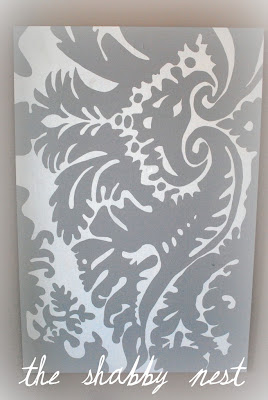
In the case of my room, I really wanted to incorporate gray damask. I was hoping to use it for the curtains, but with the amount of yardage I needed, my budget would have been sunk. So I decided to bring the damask into the room in a stylized piece of art.

Here's what I did...


1. I found myself a piece of wood in our back room that had a smooth surface (you could also purchase a canvas, but I was aiming to use what I had)


2. I found a damask pattern I liked. In this case, it was a picture of a fabric sample, Natele from Duralee, which I printed out so that I would have a pattern to work from. As you can see, the pattern was quite intricate, so I tried to simplify it as I drew it out...but I'll get to that in a minute.


Natele from Duralee

3. I painted the piece of wood (or canvas) the background color of my pattern. In this case white. I used the same paint from my bedroom project...interior latex in white and dove gray. I would suggest using a graphic print and limiting your painting to 2 colors...unless you are a real artist. It will make the project look more professional in the end.


4. Here's where you can go a couple of different ways. In my case, I have a photo projector. I placed the print on the projector and then traced the projection onto the wood. Or if you are good at this sort of thing, you can look at your picture and freehand it in pencil onto your wood. Finally, if you don't have a projector, and aren't good at freehanding stuff, you can draw a grid on your picture and then draw each section of the grid onto your wood. (I wouldn't suggest drawing a grid on the wood - it's difficult to remove the pencil lines - but the grid on your picture will help you get the proportions correct when you draw onto the wood. )
In my case, I used the projector, and actually wish I had just freehanded it because when you compare my inspiration pattern to the actual painting you can see how the projector distorted the image. I also had a difficult time actually seeing all the lines I needed to trace. In the end I had to fix a few things, and the image is still a little off. Oh well, live and learn right?


5. Now use your other color and fill in the pattern. It's simple...just like coloring in the lines...except with a paintbrush. You'll notice that I reversed the colors in my painting using gray for the motif and white for the background. This is because I actually wanted the finished painting to be more gray than white. You can also see that I rotated the design 90 degrees...that's just because I liked the composition better that way.


6. VOILA! A custom work of art.


Don't forget tomorrow is Frugal Friday again!! MckLinky goes up at 12:00 am EST for all you night owls.

And this week's winner will be announced at So You Think You Can Decorate on Saturday...next week's challenge goes up on Sunday. You can vote until Friday at 12:00 MST.

Have a great day~

Tuesday, March 23, 2010

Master Bedroom Headboard~

In my SYTYCD week 4 challenge post, I promised to explain a little more about how we created our master bedroom headboard, so today I thought I'd do just that!

As I've mentioned previously I wanted to go with some sort of architectural salvage as a headboard. An order, it seems, that proves to be quite tall when you are trying to stick within a budget. I visited a local architectural salvage shop and found many wonderful alternatives, but decided finally to use a narrow 5 panel door. When it came down to it, however, I just couldn't bring myself to fork over the cash.

So I debated and debated about what to do. And the answer finally came when the hubby and I were cleaning out our storage room. We came across some old wood left here for who knows how long. And when I say old, I mean old. And cracked and looking more like it should go in the burn pile than anything else. But the wood spoke to me. (Not literally, silly. ) And I knew that it would make a perfect headboard.

So I asked the Hubby in my sweetest wifey way if he would build me one. I told him I wanted it to resemble a narrow five panel door and that I wanted it to have character. He added that he wanted it to be substantial, and Anthropologie-ish. Yes, I am telling the truth. The HUBBY said that. No, really, I promise he did.


In order to make the headboard "substantial", the first thing we did was to glue three long planks together back to back to make them thicker (one plank on the back and two on the front). You can see in the photo above that we left a seam, and chose purposely to use the side that was more uneven and cracked as the front.

We clamped the boards and let them dry overnight. After they were thoroughly dry, the hubby cut the boards to length (approximately 80") and set to work trimming the "door" out with 1x3's.


He simply cut 80" lengths for the top and bottom and then cut the shorter lengths (5 of them ) to make the "panels" - and yes, 5 cross pieces creates 4 panels - not 5 - and I'm okay with that. From here all we did (and when I say we, I mean the Hubby) was screw them together. After I saw the finished product, I asked him to add another small piece to the top and have it hang over about 1/4" to give it more of a finished "headboard-ish" feel.
Then came the fun part. We took a hammer and banged that door until it looked nice and aged. Rather than filling the screw holes in with wood putty, the Hubby had the idea of adding wood plugs. He glued them in...a little haphazardly...to help with the aged and used look we were going for.


Finally we painted it out in a soft dove gray. "Moonlight" by Ralph Lauren. (I know, I know Home Depot doesn't carry RL paint anymore, but according to AnNicole, the RL company says that the paints will still be available at independent distributors, so breathe easy folks!!) We purposely did not prime the wood to allow the knots and imperfections to come through and add to the age-y feeling!!


Now because of the Hubby's need to make this headboard "substantial", it is, shall we say, slightly weighty...okay, it is dang heavy. So to secure it to the wall, we needed to use large L brackets and long drywall screws. You can see that the brackets stick out just a bit further than the headboard, but that's okey dokey because my pretty curtain panels cover them.

Two last notes...

I had a lot of comments about the pretty canning jar. It was a gift, and the lid came with that fun opening in it (it has a glass piece that fits inside.) So I simply removed the glass and used the figure-8-shaped opening to help me arrange the stems. Serendipitous, no?

And the curtain panels? They are the Alvine Kottar panels from IKEA.

Have a lovely Wednesday~

If you liked my master bedroom project, there's still time to vote at So You Think You Can Decorate...you can head over there now...pretty please.

Monday, March 22, 2010

Linky Love~

You all pulled it off again! This week proved to be another fabulous edition of the Frugal Friday Linky Party!! If you didn't get a chance to check out the Frugal Decorating goodness, the links are still up here.


Today, I just wanted to share a smattering of the inspiring posts from my fabulous readers...

Bliss Bloom Blog shared these wonderful Washi tape easter eggs. How pretty are they?

I just loved this bright and cheery dresser makeover at Peppertowne!


I love the serenity of the entry hall redo at Just the Right Angle.


And finally, this amazing Foam Easter Egg decoration at Room to Inspire. I've got to make me one of these little beauties!!

I will be posting more about my Master Bedroom redo in the coming couple of days. I have had so many questions about it, so don't worry...I'll try to address them all. If you haven't had a chance to vote over at So You Think You Can Decorate, please go over and vote today!!
Have a great day~

Äntligen dags !

Planerar nu ett vår-öppet Mingelkväll den 22 april i City
läs mera på skönhetsbyrån.nu
Vårens och sommarens NYHETER och makeup trender presenteras
och Stylistcoach Evelina Grandell finns på plats
och berättar om vårens Modetrender.

Sunday, March 21, 2010

So You Think You Can Decorate: Week Four Challenge~

Welcome to the Week 4 Challenge for So You Think You Can Decorate.


This week's challenge is to use the color white. "No problem", says I. I just love white!! Our Master Bedroom has received no love at all since we moved into our house a little over 2 months ago. My plan was to use a large dose of white in this room. Perfect for the week 4 challenge!!


Here is a before photo...and a perfect example of how NOT to use the color white.


No headboard, no curtains, lumpy-bumpy comforter. It reminds me of a bad dorm room...with the exception of the color on the walls. And because we are renting our home, the wall color had to remain...providing a little bit of a challenge, but I love a challenge!


So let's see... a list of everything I needed to get this room out of its bad-dorm-room-funk and into master-bedroom-retreat-mode...

  • a headboard
  • window treatments
  • pretty bedding
  • a bedside table
  • art

Wow! That's a tall order...but here we go!!

Now here is an after photo....hard to believe it's the same room, huh?


The Headboard:
I wanted to use a piece of architectural salvage as a headboard. So off I went to the only architectural salvage store in the surrounding area. I decided to use an old 5 panel door. The problem was the price. Just a little more than I wanted to pay. Enter my dear husband who built me a "5 panel door" headboard out of a bunch of old wood in our storage room. We painted it out in a pale dove gray to match the gorgeous curtain panels I found.


Here is a closer view of the headboard. Join me here later this week, when I'll go into more detail about our design process and how we put this together.

Window Treatments:
I purchased the drapery panels ready-made from IKEA and actually ended up saving a lot of money over the amount I would have spent on fabric to make the same extra long curtains. I hung them at ceiling height to make the room seem taller. The curtain rods I used (not pictured...sorry) were pretty much the least expensive ones they had at IKEA...problem was that they were black...so I just spray painted them with Krylon spray paint in a brushed nickel finish...problem solved.


The Pretty Bedding:
The bedding is the thing that really makes the room and ties the whole color scheme together. I added the tan burlap pillow and the pillow with the crown motif to tie in the color of the walls. The pillow with the vintage french photography graphic ties in both the tan and gray colors while the charcoal pillow punches up the gray in the color scheme. The pretty rosette pillow finishes the grouping. One of the keys to using white in decorating is texture. The lovely coverlet on the bed adds that element beautifully and makes the entire bed seem elegant but comfortable.


Here is a close up of the ribbon detail on the pillow cases. Join me later this week and I'll tell you more about these as well.


A Bedside Table and Art:

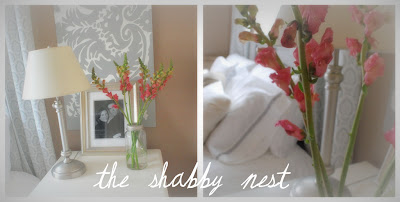
The side table was in our basement and was old and beat up. I gave it a coat of fresh white paint and it became the perfect partner to the bed. To accessorize the table, I added a lamp that was previously black metal. I simply spraypainted it with the same Krylon paint I used on the curtain rods, and it looked perfect. I added a favorite photo of the Hubby and me in a silver toned frame, and for a bit of color some lovely pink stalks in a large vintage canning jar with a unique metal lid that added to the color scheme (and helped with the flower arranging.)

Finally, to finish off the grouping, I added a painting I made of a stylized damask motif. I found another piece of scrap wood in our storage room and used leftover paint from the headboard and table. It ended up being just what the room needed...a little modern but with a vintage feel. (You can see it a little better in the photo below.)


Now our neglected Master Bedroom is a pretty white retreat to relax in at the end of a busy day!
Please take a minute and go vote at So You Think You Can Decorate, you won't be disappointed!
Resources:
Drapery Panels, curtain rods (not pictured) and Ofelia Coverlet: IKEA
King Size pillows and white pillow cases (gray ribbon detail not inlcuded): Target
French Photography Graphic pillow, Crown pillow, Gray Ruffle pillow and White Rosette pillow: available in my Etsy store (theshabbynest.etsy.com)
Clock pillow was won in a drawing here.
xoxo
Wendy

One of my favoritepictures...

Jag lyckades scanna in en bild från min favorit tidning
bilden är från ett nummer 2001 men
inredningens klassiska stil består

Saturday, March 20, 2010

Välkommen in

Vilken trevlig entré, eller hur ?
Hade önskat man fått se hela huset.

Friday, March 19, 2010

House for sale..

Vilket hus är din favorit?
Kikat runt lite på amerikanska mäklarfirmor.
Dessa vackra hus ligger i ett område i Washington som heter
Virgina/Fairfax ,
Vi har goda vänner som bor där och familjen är över
då och då är över på lite jobb via min man,
såå kommer tanken..Tänk Om vi skulle flytta hit ?

Priset runt 6-7 miljoner SEK


Vilket är din favorit?

Min favorit blir huset i mitten :)